Pages

Tuesday 13 October 2015

Human facial and character modelling

I just wanted to quickly upload a couple of renders I have recently produced from another model of a face. This is still a work in progress and I am now taking it into mudbox to sculpt in the detail and try and get as much of a likeness as possible. 

So far I am happy with how it has turned out, modelling faces is always tricky and it can be difficult to keep the topology clean and efficient for animation but it is always worth spending the extra time to get it up to a good standard. The current results are as below:


I have also recently modelled this character as a quick test for character modelling. It took roughly 2-3 days to model and UV unwrap which I wouldnt say is too bad. Again I am happy with the results and its nice to keep trying new things.


Monday 17 August 2015

Stormtrooper Helmet with some colour

As the title says really, Iv spent some time working with shaders to give this model some colour. I always say this but its amazing what some colour can do to your models.


Thursday 13 August 2015

Stormtrooper Helmet

I just wanted to showcase my most recent completed model. This time I thought about combining my interest for hard surface modelling and characters and came up with a storm-trooper helmet. It felt quite fitting especially with the new film being released later this year. 

It was quite a fiddly shape to manage which I didn't expect when I first started. I'm very happy with the final result though and feel it was worth it.


Wednesday 27 May 2015

Anatomy Modelling Part 2

So this week I set myself the task of completing the geometry for my anatomy model. All that was left to do was the head which I knew would be the most difficult. My main concern was to understand the way the face is constructed and to then follow it with the topology, for someone that hasn't done a whole lot of facial modelling I did find it a challenge but iv managed to muddle through and create something which I'm quite pleased with.

The most satisfying part of this project has been all the stuff I have learnt about the human body, more so than the model itself. The model is basically a result of the research and knowledge I have picked up from the internet, kind of like a result of various tests that I have experimented with. The most crucial part to the research was to learn how the eyes, nose and mouth can be animated and how to create good geometry that wont badly deform with the slightest hint of movement. The nose and the mouth are probably the hardest part to create as you need to get the cheek and frown lines extruded from the base of the nose and somehow connect them properly to the mouth. When done correctly it will result in some nice flowing geometry that will be perfect for animating.

Shown below are the work in progress of the face and the finished product with the head attached to the body.


I would say I thoroughly enjoyed this part of the project and can come away from it knowing that it was a success and a big learning curve for organic character modelling. I'm looking at taking it over to Mudbox now to add in some finer details and see how far I can push the geometry.

Friday 22 May 2015

Anatomy Modelling

Since my last project that was posted on here (which is still a work in progress unfortunately) I have been fortunate to have been kept busy with my freelance work, leaving a lot less time to work on personal projects. It's been great being able to work with clients and studios to achieve a vision, something which makes the client feel proud to show to represent their business. To date the work has been really varied ranging from 2D flash and after effects animations to 3D cg explainer films. I have really enjoyed the mix up of methods and software as it always keeps you fresh and constantly learning other areas of the industry.

My primary focus is still 3D and realism, which I have continued to do in my own time which leads me onto this post. Besides the model of the Ape in my portfolio iv never really created a character, iv never really been overly interested in creating characters either as my main area of interest has always been hard surface modelling, mechanics etc and environment modelling. That said, I cant help but think that by not touching into other areas I will be missing a trick and other ways to model. Mechanical objects such as cars etc are also becoming more and more organic, so much so that hard surface and organic modelling will ultimately have their boundaries blurred in this area.

So i thought id pick up on some anatomy. I know this is a bit irrelevant to the last paragraph but by learning how to properly model a person I will be essentially killing two birds with one stone so to speak. Anyway (as you can tell this post has no thought to construction, just thoughts out loud) I have made a decent attempt to start learning anatomy, firstly its bloody hard, secondly it looks bloody good when you've figured something out. I have been watching countless tutorials, looking at hundreds of reference photos and reading countless sites to see how people go about it and I think im now on a good path to creating something worthy of sculpting and maybe an attempt of rigging. So far I have produced a solid base mesh, the torso and the hands are probably my favorite parts as they were so intricate and fiddly. The feet and legs could probably do with some more work but in the mean time theyll be okay, the geometry is good all over which is crucial at this stage.


I dont usually show screen shots but in this case I thought it would be more helpful than a render as it allows you to view portions of the mesh and how it was made. I have picked up a few helpful tools along the way, some which i was a bit annoyed at myself (and a bit embarrassed) for not previously knowing. One being adding a vertex, before i used to use the split polygon tool and then delete the edge.. another being the collapse edge tool, before i would do it manually. The bridge tool being another but in my own defense i did know about this one but preferred to use the 'append to polygon' tool except now I have found reasons to use the bridge instead, mostly it being much quicker.

One more tool I have learnt which I was happily surprised about is in the 'duplicate special' option and choosing to use an instance so that everything I do on one side is instantly copied over. This is a great thing to know but as soon as you merge the hands and feet etc to the model the instance does disappear so you need to recreate it. I know there's the mirror function in with the soft select tool but the instance version seems a bit more reliable and accurate, plus you don't have to have the model merged for it to work. On another note it also saves you copying the model over just to see how its looking and then deleting it to continue with the half you're working on.

I'm pretty happy with the model so far and I don't think its a bad attempt at a realistic human. Next thing on the list is of course the head which I will add in its own post when its done, this will obviously be the most detailed and difficult part of the project but at the same time the most rewarding. 

Something worthy to leave on, I saw this quote the other day and thought it was really true and relevant. 

"It's common to quit because it takes too long to see results. Just know that the process IS the result."
-LeSean Thomas

Monday 13 October 2014

Technical modelling and more curves + more odds and ends

After working on such a free rein project such as the last environment (still in progress unfortunately). I wanted to throw some technical modelling back into the mix to keep me sane and to give me something I enjoy doing as well as forcing me to push the boundaries that bit further. As technical and mechanical go so well together and Iv half attempted it in the past, Iv decided to try and make another motorcycle. This time after a lot of inspiration from some really good modelers I want to try and make my model as detailed as possible. I have chosen to re create the BMW S1000RR, one reason because the bike is asymmetric, so no copy and pasting but also because it has some really nice features that look, well.. really hard. As always lots of good references always help with the production so I gathered a tonne of imagery from the net to help me make a start.

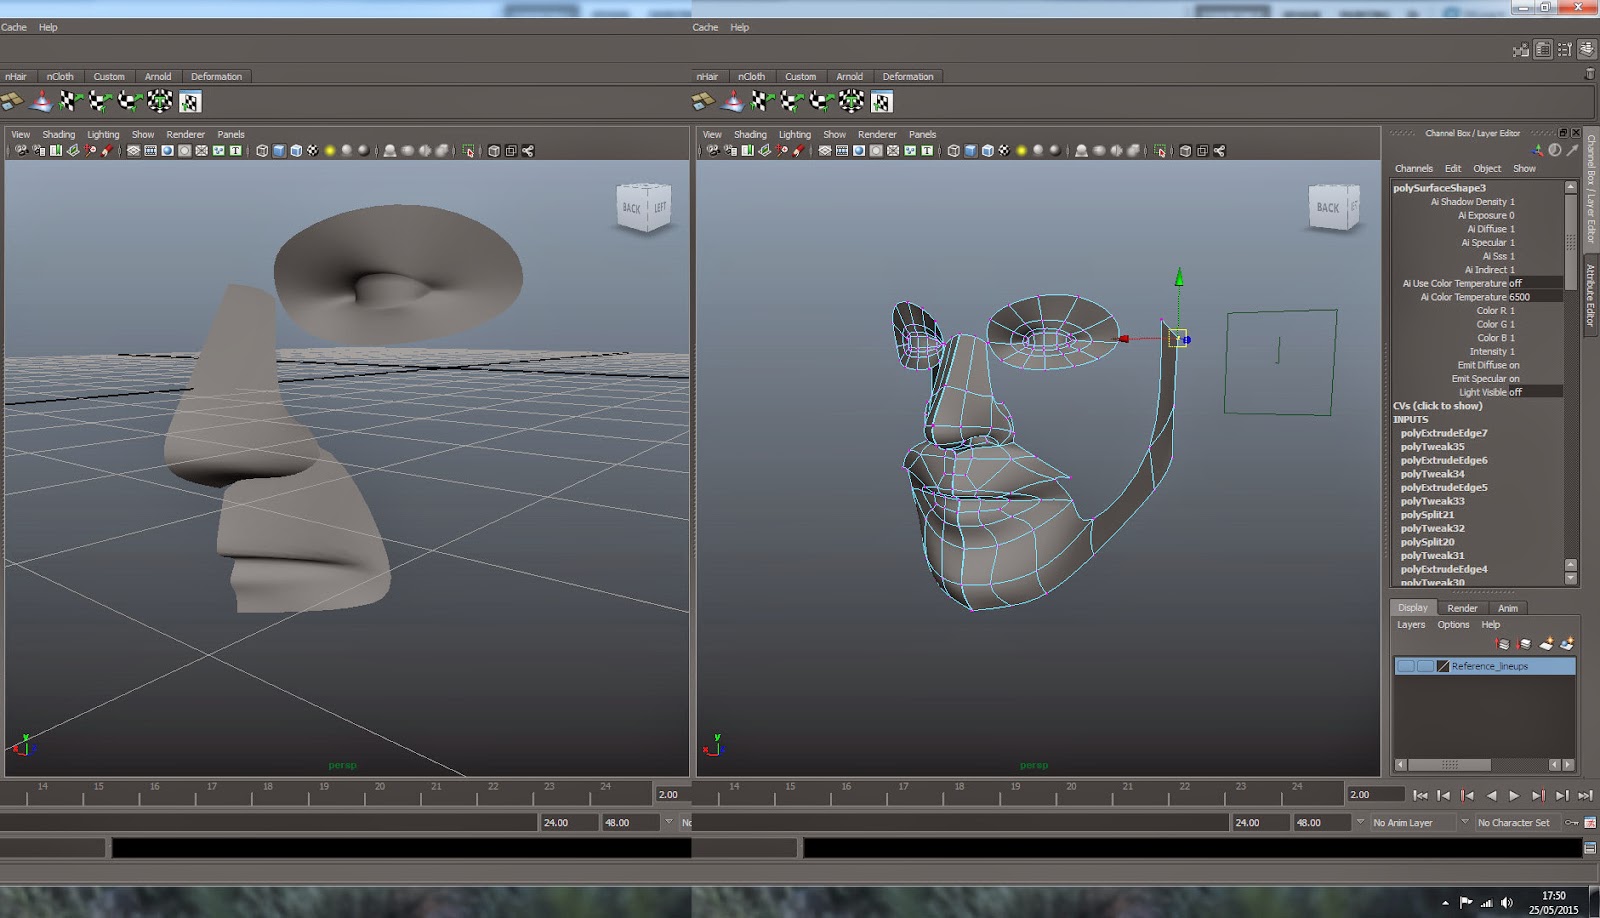
I understand there is a lot of different ways to model this kind of thing but I feel most comfortable with mapping the model out with curves then essentially filling it in with poly planes, snapping the points to the curves. It seems to me to be the easiest way of keeping things neat. Below are where I am at with the reference guides and a little bit of modelling with the front end, just to see how the guides are doing really.


Its quite hard to see more than just squiggly lines at this stage but you should be able to pull out some shapes and detail from the guide. As always with this kind of model, the top half is easier to make than the bottom. I'm not sure if i'm missing a trick but it starts to become a lot of guess work which takes a lot of time.


So far this is the best of the geometry iv put together, I'v started to work on the swingarm but its not worth showing yet as it is still pretty basic. Extrudes and bevels really are your best friends when it comes to this sort of thing.

Besides from starting the motorcycle model iv also made some quick 2d environments for the portfolio but to be honest they're very quick and a little sketchy but I needed something for an interview and desperately needed to pull something together. Shame on me I know!


I feel uncomfortable posting them but its good to know what I can do when times limited, these took around a day to make (for both). Paid Illustrator a visit for the second one, I forgot how fun it can be!

Also, here's my last effort at our group modelling thing I mentioned in the last post, unfortunately it kind of died a quiet death and went stale (Not my models, the tasks). I'l end this post with my Mc Esher inspired image, what a pain that was to make!


Wednesday 23 July 2014

A bit of a catch up

It has been quite a while since I published my last blog post and there has also been quite a few changes and updates. Not just in my work but life in general, I have been super busy trying to juggle life around working freelance and trying to help arrange a wedding, (Yes my own!) which in particularly for me is so crazy and by far the one thing that has been on my mind the most. Anyway, I hadn't realised I had neglected my poor blog so much this year, I have a fair bit of work I can share so I will start with that. This most likely wont be in date order, I will be putting it up as I find it and where (I think) it will fit in.

I will start where I left off, all this work is already on my website by the way so it might not be so new to everyone. I fully finished the Camaro model and have a quick update of it in all its glory, the only thing that has changed are that it has its own wheels now and doesnt have to share with the Bugatti.. 


Looks lovely doesn't it, I will hopefully manage to get around to throwing some paint on it but for now it will do. I'm very happy with how it has turned out and I have learnt a lot from the previous Bugatti model which I knew not to do again. Such as:

-Dont add too much geometry too early as its an absolute nightmare to keep look clean and crease free later on should you need to change anything.
-Try and keep a proxy mesh around as long as you can because it also helps with editing geometry as you dont have to manual handle so many individual vertices.
-Try not to place vertices too close to each other, this was quite hard at times with the Camaro as a lot of panels end up meeting to a point. In this case just keep it as tidy as possible and avoid any overlapping, remembering to keep the polys as quads, do not be tempted to merge them all to one point! I hadn't merge multiple vertices before as it should be common knowledge with modelling but I'm just saying.
-Probably the most important point and thats to constantly refer back to your reference images, if it doesnt make sense find more images! It helps so much.

On to the next subject, I went back to digital painting again as to me it feels like a nice release from the 3D world and the grey'ness of Maya. It feels so much less serious just painting with a brush than having to carefully think about placing edges and vertices etc. So this time around I took a photo from a recent holiday in France, on a beach in Nice (Very nice) of Kayleigh, this holiday meant a lot to me as it was a life changer (getting engaged etc) so it only felt right. Plus my paintings of people have always had the most room for improvement. This could have gone drastically bad for me but luckily she didnt mind the outcome (few).


Okay so its not fully finished but I was mostly concentrating on the face. I will more than likely return to it to finish off as much as I can but the sea and pebbles will probably drive me mad! Again I was really happy with what I had so far, I spent too many hours getting it to where it is but it does like good (if I can say so myself). The thing I learnt the most from watching countless youtube tutorials and just through painting is that the base layer/colour is vital to making the rest of the image work, one solid colour that you work the rest of the colours into. As you can see some of the hair is a bit patchy and will need some more colour worked in but itl do for now.

Next up is the piece that probably gained the most amount of interest that any of my work has done to date. It is a piece which was more of an experiment as much as a challenge to see what Solid Angles Arnold renderer could do. I knew it was a good renderer but wanted to see for myself how quickly I could pick it up and if it was any better than Mental Ray. From what I found it is much easier to use than Mental Ray and you can get some fantastic results with it with little effort. So I chose to create an environment, in specific a fancy bedroom. I haven't touched any environment modelling since Kernel so it was a bit of a refresher as well, I'll upload an image and then discuss it further after:


So here is the final piece, doesn't look too bad for a first attempt at Arnold I will start by saying the fabrics, cushions and bed sheets were by far the most frustrating part but it was worth persevering with, I learnt a lot about Ncloth throughout which is always handy to know. The IBL was also something new to me and I did try a couple of images but settled on this one in the end, it essentially does the majority of the lighting work itself which is nice. I would say this project is the one that made me realise how much of a difference texturing makes to your models. I know its obvious as it brings it to life but in this instance the modelling is pretty simple and nothing too complicated (as shown below):


As you can see it would have looked a bit lame if I had left it at this stage but I didnt have any intention in doing that. This project was to push my knowledge of rendering, lighting and texturing. Below are a couple of test shots with the lighting, as you can see it was a bit of trial and error: 


I decided to change out the image for something a bit more city based as the country look wasn't doing anything for me and just didn't look right. It was  definitely a challenge trying to figure out the correct amount of exposure and levels for the lighting but again, something well worth learning. Another thing which took a while to get my head around was the way in which Arnold actually works. You have 6 options to adjust in the render settings under sampling, these are Camera (AA), Diffuse, Glossy, Refraction, SSS and Volume Indirect. As you can imagine each setting affects the other in some way or another so it can take a while to find a nice balance and to also cut out as much of the noise (as seen in the first image here) but without over doing it and having excessively long render times. I would definitely recommend giving Arnold a try, it is a really nice way to work when rendering and made much more sense to me than mental ray does.

Next up we have another little test I thought I would put myself through. It is essentially about modelling with circles and cutting holes in itself without using booleans and also keeping it looking clean. This was a bit of a brain bender, it can be a royal pain trying to keep the geometry tidy and structural. Again I learnt a lot from it but the thought of re making it doesn't overly excite me. Here is the final piece below:


This item is the front wheel from my motorcycle. I went to town a little bit with all the detail which would unlikely be necessary unless it was an extreme close up. The hardest bit was puncturing the holes through the actual hub without disturbing the geometry too much, I will try and get a contour render up soon if I can remember. The part which I thought would be a big challenge was the brake discs but they were surprisingly simple. This model was mostly made by placing vertices and using the chamfer vertex tool, selecting the produced face and then extruding it through the object. This one might be cool to texture and throw some normal and displacement maps at to try and achieve something a bit more realistic than the last wheel I made.

I have been working on this next piece since around May on and off when I get the chance to do something for myself. Freelance work has been taking up a lot of my time and has been on my mind quite a lot which has stopped me playing around with Maya. I have been making another environment though, this time out doors and of a quaint little street pictured in France which I thought would be perfect to re create. I originally wanted to make a little enclosed court yard but I couldn't find anything suitable. To be honest this has been quite a challenge, I dont know if its because my mind has been elsewhere or if I have been too distracted by the lovely weather, I just don't know. I have reverted back to using mental ray as well which can be a bit of a pain itself. I wanted to create something full of nature, so full of potted plants and growing ivy etc because nature is something which I can identify is lacking in my portfolio, realistic nature anyway. I have mapped out the scene and started to work the textures into the models, it's not looking too bad but there is still a long way to go yet. By using the software 'Crazy Bump' I have been able to create decent looking texture maps which work really well and it is such a simple yet effective program to use. I have uploaded below some work in progress of where I am at with the French street scene:    


As you can see it is constantly changing, I am still unsure where I want the light to shine in from as well. Progress is being made, its just not at the rate I would like it to be. Some of the textures could also do with more work, especially the floor as it lacks a lot of definition. Over all its not too shabby though, with time it will look good I'm sure.

Recently a few guys from uni have created a little group on facebook where we set weekly briefs for modelling, we use just one word briefs and we all have to interpret it how we see it. Its generally speed modelling as we don't all have a lot of spare time to try and fit something extra in but its all good practice and keeps your skills up. Below are the first few we have done, I will list the one word with each image so you can see where each model has come from.

Tank:
I felt I had been a little too ambitious with this one, its supposed to be a fish shaped fish tank full of water. I had one afternoon spare so quickly put something together, it doesn't look too bad but could be a bit more refined.

Mechanics:
After the first week being a bit ambitious for how much time I had I thought I would play this one a bit safer. I absolutely love mechanics and was so tempted to go all out but I just didn't have enough time to produce something super cool. It is what it is though, a simple classic style toolbox with a rag draped over it, does the job!

Space before science gave us facts - unfortunately I didn't have any time at all to make anything for this brief.

This weeks one is 'isometric', I have something pretty cool lined up but I don't want to show it just yet and it will have to wait for the weekend unfortunately.

That's all for now, I don't think I have missed anything out but if I have I will be sure to add it in. If you have managed to last the whole post you deserve some points or a prize or something, well done.

Saturday 1 February 2014

Lighting and rendering

So today I thought I would try and figure out/teach/understand how to light and render properly. For this I went back to my Bugatti model as I still feel it is the most complete model I have and my Camaro still needs a bit more work. Anyway, I started out by reading up on lights, its crucial to have 3 key lights to distribute the lighting over the model, for this example 2x spot lights were used and 1x point light. The point light is to just add a bit of an overall spread of light where as the spot lights are there to pull certain pieces of detail. The point light also has raytracing turned off. To add to the reflections a HDRI was applied to half of a sphere, with a cylindrical map and placed to surround the model, this makes a huge difference and makes the reflections look much nicer as the light data from the image is transferred to the model, I'm not sure what the correct term is but either way it looks extremely nice. The next job was to set up the Final Gather which to be honest were pretty much left at default with a couple of minor adjustments to the point density and accuracy. They may have been a few other small things but I cant remember them off of the top of my head.

Before today I really saw rendering and lighting as a massively unknown/unexplored part of maya but I do definitely feel a lot more comfortable playing around with it now and understand it much more. I know this model still needs a lot more work but I am really happy with the start I have made on it. Lighting and rendering is something I am definitely going to look more into it as it feels really good putting colour into your models and bringing them to life.


Thursday 16 January 2014

Portrait digital painting

I have tried to teach myself some more digital painting after enjoying producing my last image. Its also nice to vary the work load as maya can become a bit frustrating after a while (for me anyway). This time I wanted to paint a person, its something I usually try and keep away from as iv never had that much success in the past with them. I wanted to keep this one quite illustrative and stylized, once the outline was down it was straight forwar to colour, all be it a bit time consuming. Digital painting isnt to different from real painting in way that you make a little pallet of colours and mix them together etc. Anyway I really like the final outcome and will definitely be doing more in the future.